Category Archives: Projects

MAME Arcade - Finished

Finally, another project – MAME Arcade – Part 2

*Updated May 2024 – The supplier I bought my parts from appears to have scarpered. However, the maker of the flat pack kits I used has now set up selling these direct via knockoutarcades.com. I’m very happy with the quality of mine, so happy to recommend them.

Following my previous post, helpfully referred to as Part 1, I thought I’d just run through the build process. The assembly was partly done in order of when items arrived, and partly what I felt up to doing. Realistically, this could be all done in a day if you had all the parts to hand. I spread it out over a few weeks.

Software

The first thing I did was start to configure the RaspberryPi 3b+* I already owned for use inside the cab. The flat pack kits had a 5 day lead time while they were being cut to order, I was excited and wanted to make a start. The RaspberryPi was all I had to hand while I was waiting.

I took the Pi out of the arcade stick housing it was in before and took a couple of minutes to adjust the cabling of the stick so that it is now just a usable USB arcade controller to use with my PC or whatever. I used this stick for the initial config, and also later when it came to testing the monitor I picked up.

In choosing the front end for my system, I had a bit of a look around all the pre-built images on Arcade Punks etc. to see if I could find one with a suitable collection of mostly arcade games along with a theme that wasn’t ridiculous. I could not.

I chose to just build my own setup, with a basic install and curate my own game selection. A few people were suggesting alternatives to the RetroPie software for me to consider, namely Recalbox, Lakka, and Batocera. Fortunately this comparison article was handy for just running through the differences, and after a bit of reading, I decided RetroPie was still the most appropriate for me. I did a fresh install of the latest version of RetroPie as the one already on my SD card was a couple of years old.

I’d only got it hooked up to my working from home monitor, but knew I would be putting a 4:3 or 5:4 ratio screen in the machine, so I played a bit with the shaders in the setup to find something suitable for that screen. It looks a bit silly in the pictures below, but I’m really happy with it in the finished system. Scanlines and a bit of a curve to the display, to get it looking close to how the games would have looked on an original cabinet.

After copying over a starter collection of ROMs, mostly just my favourite shmups and brawlers, and a complete set of NEOGEO games, there wasn’t much else to do except play Neo Turf Masters, and wait for parts to arrive.

Start and Coin Buttons

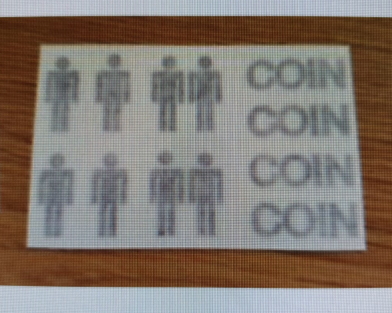
Fortunately I didn’t have to wait too long, my parts delivery arrived about a week later. All the buttons and joysticks arrived a day before the flatpack kit, along with the button decals I’d ordered from eBay. So first up, adding the art to the buttons. Fairly simple to do, just be patient prising the button caps off and try to line the decals up where you want them. Happy with how they turned out, even if Player 1 is slightly losing his head.

Riser

Once the kit had all arrived, I decided a sensible place to start was the separate riser. Nice small parts, easily done on my own sitting on the floor. Also the joins are all done using modesty blocks, which is the same for the full cabinet. Was a bit of a practice before the main event. With the ongoing vertigo symptoms I was not in a hurry to work with the bigger panels of the cabinet.

Control Panel

Next up, and one of the most fun parts, putting the buttons and joysticks in. This was also the only part I needed to break out my drill. The control panel has holes pre-drilled for the buttons and joysticks, but when the mounting screws go for the joysticks are only part drilled as there are different fittings available. I just had to line up the correct ones for my mounting plates, and finish the drilling through. Was straight-forward, and I had a spare piece of wood handy that I put under panel while I drilled to reduce the likelihood of damage to the control panel surface.

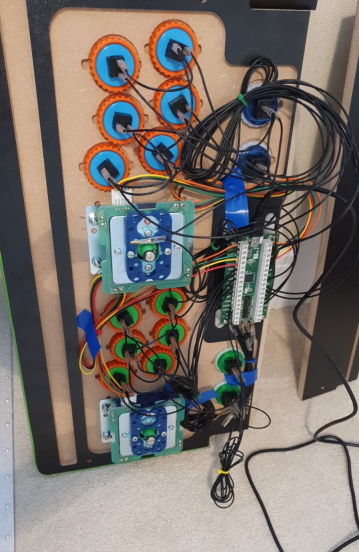
I also played around with configuring the IPAC2 interface before I attached it to the panel. Didn’t entirely register what I was doing though, but once it was all assembled I hooked the Pi back up to my work monitor and figured it out. Quick shout out to my good buddy Ross here, for sharing the below image before I started, using this I managed to orientate both sticks the right way up first time (up, down, left and right aren’t labelled but each need a wire connecting to the IPAC2.

Joystick Wiring Guide

T-Molding

Initially hated doing this, but after I’d got used to it I quite enjoyed myself. I did the riser box first then the control panel, and gradually some of the panels for the cab itself over the course of a few days. It wasn’t too bad, but I did need to buy a rubber mallet. If anything it is nice to now own a rubber mallet. It was also fortunate that I owned a hot glue gun. As much as all the guides say you don’t need glue, and the t-molding will just stay in place, they’re wrong. (Likely that’s true working with ‘proper’ cabinets, but with the grooves cut in this board, it just popped back out when you went near a bend). A bit of hot glue in the trouble spots soon sorted it though.
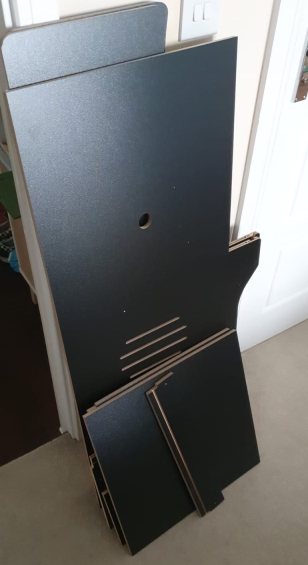
Cabinet build

Now we’re talking. I was still held up waiting for the monitor to arrive, but with the drama in getting that I mentioned on the last post I decided to make a start without it anyway, and assembled the basic frame over a couple of days. Again it was probably only an hour or two of work, I was just taking it steady.

MAME Cabinet - coming together

Screen

When the screen finally arrived, I first set it up on the table, using the Pi and Arcade Stick mentioned above. Wanted to do a bit of testing before I went through the process of mounting it inside the cabinet. Was delighted that the HDMI to DVI cable I already had just worked and required no extra effort. At this point I settled on the “Arcade 1Up” 5:4 theme for Emulation Station. I was also testing the speakers from PC, I know a lot of people complain about “hiss” using the 3.5mm audio output on the pi, but there was no sign of that here so I decided to stick with these.

The monitor has a built in USB hub, so I moved the flash drive with my games up to that, immediately solving the problem of it running hot and raising the temperature of the Pi. Also provides convenient power for the marquee light (and also the Pacman lamp that now sits on top of the cab). Both lights now switch on when I power up the cab, and switch off when I shutdown RetroPie and the monitor goes into standby. Perfect.

That done, I took the screen and mounted it to the backing panel to fit into the cabinet. Again this was easy just standard VESA fittings. I also moved the cabinet out into the lounge as we approached the final stretch. Knew I wasn’t going to feel up to lifting it onto the riser on my own, so I gave it a temporary home till I had help. The T-molding on the base of the cabinet means it also slides easily so I didn’t need to lift it at all.

Assembly

The real fun, putting it all together, and everything working. There was a bit of a delay while I waited for the art for the marquee to arrive, so it was in place for a couple of days without the art, but playable. I’ve since taken the top off the little Raspberry Pi case to help keep it cooler, haven’t had any temperature issues anyway. Once the art was added I was able to get it lifted in place onto the riser and get on with the business of playing it.

Surround

The one bit I’ve done since writing the last post, my friends were kind enough to pick up a few sheets of this heavy black card from The Range. I may have another go and do it a bit neater, but my first attempt at cutting out a screen surround / bezel went well and I am pleased with the results.

MAME Cabinet - Finished

Final Comments

The machine is pretty much ‘done’ although I’m sure I’ll continue to tinker with bits here and there. I’ve been investigating the Raspberry Pi 4 models, and it seems that the 8GB version doesn’t offer any benefits for RetroPie so I may upgrade to the cheaper 4GB model sooner rather than later. Mostly as it is able to run a few later games than my current system.

MAME Cabinet featured

Finally, another project – MAME Arcade – Part 1

So during February I fulfilled a bit of a personal goal. I have wanted to put MAME into an arcade cabinet for around 20 years, and have simply wanted my own arcade machine since I was about 10. (A little longer than 20 years). A while back I built my “RetroPie joystick in a box” which was a bit of a proof of concept to see if I thought I could do the full thing. Fast-forward to Lockdown 2021, of which I’ve spent most of the year suffering with Labyrinthitis and ongoing vertigo symptoms. As mentioned in my January Games post, I decided to divert the funds I was holding for my PS5 into this project. Largely because they’re still difficult to get hold of, and the vertigo is keeping me from playing most modern games anyway.

Thankfully, the procrastination really paid off. This process is relatively straight-forward now, compared to what was involved 20 years ago. To be honest, I probably could have done the entire build in a day, but being unwell it was nice to have something to work on over a couple of weeks when I felt up to it. As you can see from the image, it’s complete apart from needing a surround for the monitor, to cover the insides (and the DELL logo).

MAME Cabinet

The main issue that has always put me building one of these, is the woodwork. I’m fairly confident about the wiring etc involved, but not the crafting out of wood. Fortunately, there are a number of providers who sell kits for this very thing. If you can assemble IKEA flat pack furniture, you’re most of the way there.

One of the first considerations, is what size machine to build. While there are lots of nice setups using modern widescreen TVs, these are more useful if you’re going the PC route and are going to play newer games that support higher resolutions and widescreen images. However, as I was going to use a RaspberryPi for the processing, and limit myself for gaming up to the late 1990s, a smaller 5:4 ratio screen was a better option. I found a kit for a 3/4 size cabinet, along with an addon for a riser box to lift it up so it is comfortable to play standing up.

You’ll see I had a few bits already, but I’ve listed all the components of my build below with links. As usual, any marked with a * are affiliate links. For the bulk of the build I returned to the supplier, where I picked up the parts for my previous RetroPie project, and also my PS4 Arcade Stick mod unfortunately they’re now defunct, but you can get the flat pack kit direct from the maker via knockoutarcades.com. As you’ll see from the photos, my colour scheme is loosely based on Bubble Bobble, green for player 1, and blue for player 2, with green for the T-Molding (trim).

When I first thought about doing this, I was going to just buy the minimum amount of stuff I needed to get something up and running and playable for just 1 player, using some parts I already had. I probably would have saved about £150 off the initial cost, but it would have remained a work in progress for the foreseeable future. I made the decision to buy everything I wanted to make a cabinet I really liked.

  • Flat pack kits
    • The main shell of my build, this 2 player 3/4 size upright arcade cabinet.
    • This is the riser* to lift the cabinet higher. If you just intend to play seated (or for some reason you’re building one for children, you probably won’t need one of these)
  • Buttons
    • I took the same approach to buttons on the cabinet as I did when I did the RetroPie joystick. The 6 “action” buttons for each player are Sanwa OBSN-30 Screw In Arcade Buttons. Admittedly I haven’t tried a lot of buttons to compare, but all the parts on my PS4 fight stick are Sanwa too, and I love that.
    • For the 2 “admin” buttons, Start and Coin/Select, for each player I used Seimitsu PS-14-KN 30mm Screw In Arcade Buttons. This is simply because I wanted the transparent buttons so I could add art to them.
Buttons!
  • Encoder
    • When I did my RetroPie joystick, I just got a basic USB encoder* from Amazon, you could probably use 2 of these to accomplish the same control setup. However, with this build I wanted something better regarded. I went with this an IPAC2 bundle that came with all the wiring I’d need for my buttons. The IPAC2 has more than enough connections for me to do a 2 player system with 8 buttons each.
  • Joysticks
    • I had intended to get 2 of the same sanwa stick I previously used in my other 2 projects, but at the time of ordering they were out of stock. I didn’t want to wait though so I had a read up on what else was available. I eventually settled on this Seimitsu LS-38-01 stick, it’s basically the same as their LS-32-01 joystick, with a modification to make it much stiffer. I read a few positive reports from people who like similar games to me, and was convinced. I definitely prefer it to my sanwa stick for 2D Shmups, but I think I prefer the sanwa for games like Street Fighter. I am not good enough at either for it to really matter though…
    • In order for this stick to fit the control panel in the kit I purchased, I needed to select the SE Mounting plate option. I also added the H5P cable, which easily wires to the IPAC2.
  • T-Molding
    • This is the green trim around the edges of the cabinet. The supplier helpfully told me how much to order for each of their kits, I added the 2 amounts together for both the cabinet and riser, and ordered 35 feet. I didn’t waste very much when I was installing it, and probably have 1 or 2′ leftover. Happy to report that their estimates are a good measure.
  • Raspberry Pi
    • I already had two of this RaspberryPi 3b+ model*, otherwise I’d suggest a bundle like this one. It’s definitely worth having an official PSU as variations in quality of USB power supplies have been known to cause issues with gaming on the Pi. I took the Pi out of my RetroPie joystick as I don’t expect to use that any more now I have a cabinet. (I’ve just converted that into an extra USB fight stick for my PC).
    • At some point I may upgrade my machine with an 8GB RaspberryPi 4*, but shelling out another £80 when I already had one that would do most of what I wanted seemed a waste. Maybe there will be another revision or something that makes more sense.
  • Art
    • For the marquee (the Bubble Symphony picture at the top) I was originally looking at various options on etsy. Once I realised all the sellers were in the USA, would cost me the same again in shipping fees and take forever to arrive, I started looking elsewhere. I found the very helpful team at Arcade Art Shop who had a huge selection of art, and were more than happy to print my preferred design to the dimensions I supplied for my cabinet. I went for this Bubble Symphony design, printed on the flexi-film, and it just popped in behind the plexi that came in my kit.
    • I had also been thinking about getting vinyl art for the sides and control panel as well, but now I’ve assembled the system I think I like the plain black panels with just the marquee.
    • As mentioned above, I wanted art for my Start and Coin buttons. I got the arcade button decals with the COIN design from this account on eBay. Very happy with how they turned out.
Buttons with decals
  • Light
    • For the light at the top behind the marquee panel, I picked up a little 5V USB LED strip. Not sure how long this link will last, but I went for this one, with the options White, Clear and 35 cm. Looks great installed, and draws power from a USB slot on the monitor.
Marquee lit
  • Monitor
    • I originally purchased a DELL 1917S from eBay, but this was the one spot of drama where the seller said it was shipped, then when it still hadn’t turned up a week after delivery, I contacted them and three days later they just refunded me without a word. Then relisted the item. There is always one…
    • I then found a DELL 1914S from someone else for £20 cheaper which arrived next day, so it worked out anyway. The only really issue with this screen over the other, was that it didn’t have HDMI input, so I had to use one of these cables* to connect via DVI. I had one of them handy anyway.
  • Speakers
    • I briefly looked at a variety of options for amps and separate speakers that could be wired to the top of the cabinet. However this was likely to cost around £50 by the time I’d factored in powering them, and given the quality of audio you can expect from 90s arcade games, I wasn’t keen to spend that. What I did instead was chuck these speakers from my PC* inside the cabinet (where I’m very happy with how it sounds for now) and spent £35 on a nicer 2.1 set for my PC. I generally limit how carried away I get with sound, out of respect for my neighbours. If I do decide to go the amp & speaker route, it’ll probably be something like this bundle.
  • Keyboard
    • I already had the one that I was using with my RetroPie Joystick, and it conveniently sits unobtrusively on top of my cabinet. It is very handy to have a keyboard for tinkering with the software. Couldn’t find the exact model, but it’s sort of like this tecknet keyboard*, and I imagine it would be just as effective.
  • Monitor Surround
    • *update* I have now made up a surround from heavy back card, and will include photos in the part 2 blog post. The card was £1.50 a sheet from the local “The Range” and friends kindly picked some up for me given my continuing inability to walk that far. I have a few more sheets of it, and think I could do a neater job, but I’m pleased with it already and it now looks much more like a finished project.
  • Power Strip
    • For the moment, I’ve just got a fairly heavy duty extension cable in the cab. Mostly because it was what I had to hand, but also because I needed quite a long cable to get to the socket in my office, and I needed something I could easily take the plug off and put back on, to run it through the hole on the back panel. I will replace this with something a bit lower profile later.

I think that’s all the components. Build post is now up here as Part 2.

Arcade Cabinet Part 1

RetroPie Project

This month I managed to complete a project I’ve wanted to do for quite some time. I picked up a Raspberry Pi back in February, installed RetroPie and was enjoying it just hooked up to my TV with my old Xbox 360 Hori EX2 Joystick.

I had seen various projects online involving fitting a Raspberry Pi into an existing, or specially built, arcade stick enclosure. This way you have a portable system that just hooks up to power and a screen, and you’re ready to play. Having worked a little bit with customising a stick for my PS4 previously, I figured I’d give it a go.

In deciding on a colour scheme, I was inspired by this classic Namco Playstation Arcade Stick. I am pleased with how mine has turned out.

Components used:

  • 6x fire buttons – Went with the screw in version of the same buttons I used in my PS4 stick. SANWA OBSN-30 Screw in buttons
  • Start and credit feed buttons – These are the smaller buttons at the top. Although I usually prefer SANWA parts, I went with Seimitsu for these because I wanted the translucent yellow. SEIMITSU PS-14-DN-K 24MM Screw in buttons
  • 2x Side buttons – spare originals taken from my Venom PS4 stick, decent enough for function buttons and I like that being a darker colour they look unobtrusive.
  • Ball Top Joystick – Again I went with the same stick I used in my PS4 one, have been very happy with that. SANWA JLF-TP-8YT Ball Top Joystick
  • USB encoder – I got this from Amazon, mostly because I wanted it next day. Seems pretty good so far. Reyann Zero Delay Arcade USB Encoder *
  • Enclosure – Out of stock at my supplier of choice, so I imported one from China.
  • 64gb flash drive – Got this one based on size and speed, but I’ve since learned it runs hot, will need to keep an eye on that. SanDisk Ultra Fit 64GB *
  • Wireless keyboard and mouse – Had these already, the USB receiver for it is tiny, so it’s very convenient to keep installed.
  • Panel mount ports – I just grabbed short extension leads for USB, Micro USB and HDMI from eBay. Only the USB one has proper panel screw fittings, I figure I’ll just glue them in place.

*These are affiliate links, where I will earn commission if you click through and make a purchase

Installation

I originally had the power and HDMI cables plugged directly into the Pi, routed through small holes in the rear of the case. However I wanted to be able to easily detach the cables for storage, so decided to mount power and HDMI ports to the case, along with a USB port for hooking up a second controller. Unfortunately I’m impatient; rather than order some decent attachments for my dremel I only had the couple that came with it. I ended up using a small drill bit to cut the holes, which is why they look hideous. I’m going to glue the ports in place more neatly later, so I’ll tidy the holes up at the same time.

I did briefly look into building the enclosure myself (or getting my Dad involved), but found these pre-cut boxes were so cheap that it wasn’t worth the effort. Almost didn’t get the one with the side button holes, glad I did though, it’s quite nice to have them for hot keys etc.

The RetroPie software is installed on a 16GB SD card, then it’s setup to load roms from the 64GB USB drive. I find this setup preferable to using a larger SD card. Flash drives seem less prone to data corruption as well as being cheaper and generally easier to work with. Now it’s all set up though, I just use WiFi if I want to add any games or change anything I can’t do from within the RetroPie software.

We’re done, for now…

On the whole it was quite straight forward, and gives me confidence for possible future projects. I’ve also got a Pi Zero W from my birthday that I’m still deciding what to do with…

Ta-da!

Finally getting the Arcade Stick I deserve…

I recently undertook a minor project to acquire a new arcade stick and mod it with SANWA arcade components. This is something I’ve wanted to do for quite a while, but has always been held up by costs or the need for additional tools for the processes involved.

I still have 2x Dreamcast Agetec sticks that I would like to adapt, but the need to widen the holes for buttons and cut spacing for changing the PCB etc has enabled my natural tendency towards procrastination.  However, a desire to replace my current 6 button Xbox 360 stick & cronusmax combo with a new 8 button model for my PS4 sent me to Google.

My current stick next to my friend's fightpad

A little research found that this “budget” stick from venom was fairly well regarded, and even better all of the parts are compatible with standard SANWA arcade components.  As a bonus, it even has easily replaceable art. The stick itself I picked up from my local GAME, it was pretty much the same price as everywhere online, and I had a bunch of trade-in credit that made it extra cheap. The Venom PS4 arcade stick is available from Amazon here*.

As it comes...

There are various guides for this mod around, but I found this one most useful. The provider I used for components is now out of business, but this is what I used:

  • 8x SANWA OBSF-30 buttons (6 red with yellow surround, 2 yellow with red surround)
  • SANWA JLF-TP-8YT ball top joystick (in red, of course)
  • A cable to connect the stick to the PCB 
Those lovely new components!

Some people also suggest getting an octagonal gate, but once I found out what they were talking about, I decided I was happy with the standard square one…

Street Fighter V was the primary motivation for getting involved in this, and I decided straight away that I would be going for a “Ken” theme.  I found this artwork online that someone else had shared to use for now. I have asked a friend to look at maybe making a new custom design for me, so hopefully I’ll be changing to something new later.  Cutting the artwork wasn’t as bad as expected, I had it printed onto A3 and with patience and a decent blade it was pretty painless:

Cutting artwork

Changing the components over and fitting the art was all straight-forward, no messing at all!

I am really pleased with the results, and very much enjoying using the controller online.  I intend to re-purpose at least the original buttons from the Venom Stick, putting them into one of the Dreamcast sticks once I get my hands on a dremel…

Ta-da!

*These are affiliate links, I’ll get a small commission if you use them and buy something. Thanks!

Upgrading modern console storage on a budget

If like me you’ve got entry level versions of both the Xbox One and PS4, then you’re probably running out of space on those 500gb drives.  There are many guides online on how easy it is to replace the internal hard drive on a PS4 and similarly how easy it is to add external storage to your Xbox One.

There are also numerous links to External USB Hard drives that are easy to open up and remove the drive ready to use in a PS4.  The natural extension of this applies if you have both consoles and wish to upgrade the storage in each machine as cheaply as possible while still getting a decent drive.

First of all I purchased this drive*, various other sites recommend that the 2014 and 2015 editions are suitable for opening up. I took a punt on the 2016 version and am happy to report that this works fine too.  Opening the case was just a matter of patience, took about 10 minutes working around the seam with a blade and then easing it open with a small screwdriver.  There are little clips all the way round.

Once you’ve got the hard drive out, you can follow the guide here for the process to upgrade your PS4.  A little note, when you get to Step 5 and need to reinstall the software, the most obvious download on the linked page will only give you the ‘update’ version of the firmware (it’s around 250mb), this won’t work.  What you need to do is scroll down to the bottom of this page and click on “Perform a new installation of the system software”, Step 2 of these instructions has a new Download link which will give you the full upgrade file, (around 950mb so you know you’ve got the right one).  Once you’ve got that you can follow the rest of the steps to install it on your new drive.

When you’ve got the old 500mb drive from your PS4, you can put that into the enclosure your new one came in, and hook that up via the included USB lead to your Xbox One.  There are helpfully USB ports on the back of the machine so you can keep this tidy.  Once connected your Xbox will ask if you wish to format it to use for games storage, hit yes and once the format is complete it’ll be ready for use.

2TB PS4 and a 1TB Xbox One for < £70.  Bargain.

Note you don’t get the full advertised amounts of storage space, this is partly because some of it is reserved for system use and partly because of how data storage volumes are recorded, but you already knew that, right?

*Affiliate links, I will receive commission if you purchase

Mega Drive Modding Success

Off work with heinous dental issues I decided to use the time today productively.  It turns a bit of Mega Drive modding was just the thing to distract from the pain.

My wire, switches etc that I mentioned in my last blog post arrived earlier this week, and deciding I could only afford one game before I next get paid, I plumped for the classic collection* pictured below.  Flicky is one of my favourite “I’ll just have a bash” games, and Gunstar Heroes was on my list as something I absolutely need to put some time into.  The other two games aren’t bad, but I’m not so fussed. (update: was clearly delirious when I originally wrote this, the other two games are awful. Altered beast especially)

I feckin love Flicky!

I got myself sorted, cleared some space, and loaded up the guide I’d chosen to work from.  It can be found here if you’re interested.  On we go!

Minor dilemma.  Once I exposed the mainboard and found the jumpers referenced by the guide, I discovered the layout was different than expected.  Basically the jumpers were in order JP 1 – 4, where as the models referenced in this guide and most of the others I’d see go, 1 2 4 3. I wasn’t sure I could then rely on the pin diagram (and don’t own a multimeter). Fortunately I googled the version number of the board “bd m5 pal” and found this page. It’s for the two switch mod, and the guide isn’t so clear, but it did give me enough information to proceed with the first guide. (Look at me, adapting and everything).

Making the hole to fit the switch was the bit I was most worried about, but it went pretty smoothly.  Some cautious drilling, followed by a bit of time filing.  This is my first time doing any kind of mod with an externally visible part, so was relieved that it looked okay.

I couldn’t get my phone to focus on the switch to show the pins, but connecting to it was pretty straight forward.  Simply a matter of pushing the cable through a hole, and holding it in place with a blob of solder.  You’ll notice I haven’t included any close ups of my soldered joints.  This is because my soldering is horrific, and will give you nightmares.  From the second pic, you can see the main mistake that I made in the whole process.  Vastly over-estimated the length of wire required.  I went with it anyway, I play by my own rules.

I tested my switch while the machine was still in pieces, and happy it was working as required, I put the machine back together.  Gotta say I am pleased with how it has turned out!

Full Screen Flicky makes me happy! Even if I continued to commit aspect ratio sins.

It’s not so present in Flicky, but Altered Beast and Gunstar Heroes have an odd border down the left when in 60hz.  I suspect this is down to my TV.  The games running at full speed is much more important though, and I’m very happy with the results.

Just in case you were curious, here’s Altered Beast running with the switch at Euro 50hz. Yikes.

Now to pick up some games!  Must get a Japanese one soon, as the previous owner of the console had done some Mega Drive modding of their own and filed down the cartridge slot so they should fit in and I’m keen to test it. Also on the lookout for Bio-Hazard Battle, one of my favourite Mega Drive Shmups that may earn a blog post of its own.

*affiliate links, I’ll get a cut if you buy something.

Another Console Project Beckons

Been ages since I updated, again!

I did maintain the sitting on the beach plan, but my productivity was limited to a few things I needed to write for work, and progressing with my reading list.

However, I have finally got around to acquiring a Mega Drive, and as such there is a need to mod it! (What could go wrong?)

A thing of beauty, isn’t it?  I also grabbed one of the recommended SCART leads from here so it can draw stereo audio from the headphone socket.

The games that came with it were all terrible, but it is working and has a couple of controllers. I’ve now ordered the bits I need to attempt the Region and PAL/NTSC switch mod, so expect an update detailing how it went wrong in the coming weeks.

Console modding for beginners…

Slight delay getting this up, but I blame Super Bowl weekend for that.

Last week saw a couple of arrivals I’d been waiting for, my first USA N64 games, and a replacement Dreamcast shell very generously donated by Danny (@dog_retro from twitter). Friday night I sat down after dinner, got the tools out and got on with a bit of (mostly) straightforward console modding.

Firstly, swapping the Dreamcast over:

The replacement shell Danny sent to me, even including the modem and a bonus game. 😀

I watched a couple of youtube videos of Dreamcasts being taken apart to aid the process, but if anything they managed to make it look much harder than it actually was!

Looked much worse in life, and had a lot of scratching etc

Whole thing took about half an hour of console modding, really easy, and very pleased with the results.

Secondly, modding my Japanese N64 to play USA carts:

This is fairly straight-forward following the guide here.  I did have a slight misadventure where I misread the instructions and didn’t pay enough attention to the pictures.

On my first reading of the instructions, I believed the intention was to just cut out those two blocks.  This would work, but they are very solid, and would require a stronger tool.  I did attempt this first anyway, as you can see:

I then realised (after stopping the bleeding) that in fact the guide just suggests removing a whole chunk of the plastic.  Like so:

Easy with my hacksaw!  Also very satisfying for the little die-hard SEGA fan in me to take a hacksaw to a Nintendo console.  I then reassembled and tested it with my USA copy of Wipeout 64.  Much rejoicing and a successful Friday evening.

  Enough console modding for now, on with the gaming!